


Side purse to hide my money! :)
So I finally made a "hip change purse"....not quite sure what to call it really! Mom suggested I make it so that it goes around my waist (through some belt loops) and tuck into the top of my jeans and that way, the strap doesn't show under my shirt, and no one can just grab this hidden, cute "fanny pack"...except it sits on my hip...so hip pack? Here's what I came up with using some fabric, ribbon, and a seven inch zipper I had in my sewing box!


5. To keep from accidently sewing the ribbons between the front and back of the back where they don't belong, roll up the ribbon and safety pin them to the middle of the bag.


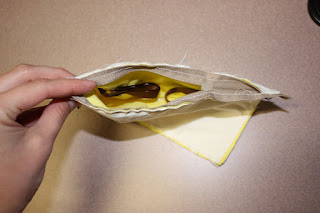
7. This is what it should look like when it's done! :) Notice that the zipper has been zipped slightly. As I was getting closer to the slider of the zipper, I moved it a little, but not all the way, because when you finish, you need the hole the zipper creates to turn the bag right side out!


(like the pointe shoes in the background? :) )
And here's how I made it!
(click on the pictures to make them bigger)
1. Cut out your fabric to the size you want it (I wanted it slightly bigger than my passport+my Euros, so it could hold both if needed. You really only need four pieces of fabric (outside front, outside back, lining front, lining back) but since I was using a light color (hence, more see-through) I cut out another piece of lining to go between the outside piece and the lining piece...so six pieces total.

2. Next I stitched the layers for the front together and trimmed the edges. I did the same for the back pieces. This way, I wasn't having to work with six pieces of fabric...but two thick pieces of fabric!

3. Next I pinned the top edge of the zipper to the right side of the outside front of the bag. I found some ribbon that was long enough to go around my waist (plus extra for tying). Cut that ribbon in half and pin each half to the outside front of the bag, with the right side of the ribbon (if applicable) to the right side of the bag.

4. Sew them in place! Make sure you only sew half of the zipper in place. The other half will be pinned and sewn to the back of the bag...

5. To keep from accidently sewing the ribbons between the front and back of the back where they don't belong, roll up the ribbon and safety pin them to the middle of the bag.

6. Next, pin the back panel of the purse to the front panel. When pinning the top edge, make sure to pin only to the half of the zipper that hasn't been sewn. On the corners of the top of the purse, you can stitch all layers together. (Look in the following pictures).


7. This is what it should look like when it's done! :) Notice that the zipper has been zipped slightly. As I was getting closer to the slider of the zipper, I moved it a little, but not all the way, because when you finish, you need the hole the zipper creates to turn the bag right side out!


Great idea. Thanks for the tut.
ReplyDeleteThanks!! It came in very handy while I was traveling and carrying cash (didn't really want to keep it all in one place or keep it in the hotel). Also, when I tied it around my waist, I looped it though a belt loop to help it stay in place.
ReplyDeleteVery Cute! Thanks for linking up to What the Cr@ft!?
ReplyDelete